Most homeowners pay for an artificial turf installation without ever seeing what happens. The crew shows up, the yard looks different at the end of the day, and whatever happens in between is a black box.
That’s a problem. The corners installers cut on a typical install day are exactly what determines whether your yard looks great in 15 years or starts falling apart in three.
We’ve completed more than 10,000 artificial turf installations across Texas and Florida, so our crews don’t learn on your yard. Here’s what a real install day looks like at Magnolia Turf, hour by hour, and what to watch for if you’re hiring someone else.
Quick Answer About Artificial Turf Installation
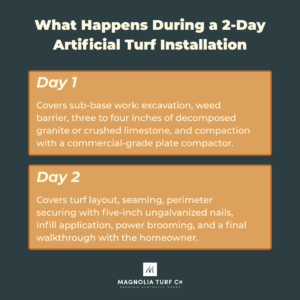
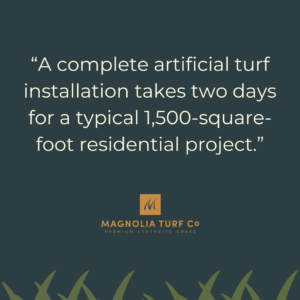
A complete artificial turf installation takes two days for a typical 1,500-square-foot residential project. Day 1 covers sub-base work: excavation, weed barrier, three to four inches of decomposed granite or crushed limestone, and compaction with a commercial-grade plate compactor.
Day 2 covers turf layout, seaming, perimeter securing with five-inch ungalvanized nails, infill application, power brooming, and a final walkthrough with the homeowner.
What Artificial Turf DIY Installers Always Underestimate
Before the timeline, one piece of context matters. Most homeowners who attempt their own installation underestimate the cuts.
Cutting turf around trees, rocks, pavers, and the perimeter of your yard isn’t like cutting paper. It takes practice, the right tools, and a feel for how the turf moves under tension. Seaming follows the same rule, and a bad seam is visible from across the yard for the next decade.
A typical 1,500-square-foot DIY job takes most homeowners about a month of weekends. We finish it in two days. The difference is mostly in the cuts and seams, where skill compounds quickly.
Artificial Turf Installation, Day 1: The Sub-Base
We arrive at the warehouse around 7 a.m. to load materials. Sub-base for a typical 1,500-square-foot project runs roughly 22 tons of decomposed granite or crushed limestone, which is why this isn’t a weekend project for most homeowners and why the right equipment matters more than effort.
The crew arrives on site around 8:30 a.m. Day 1 is entirely sub-base work, and it’s the most important day of the install.
First, we remove the existing dirt. Then we lay a proper turf weed barrier, a spun-bond polypropylene fabric that blocks weeds from coming up through the turf without restricting drainage. From there, we spread three to four inches of sub-base material, grade it for proper water flow, and compact it at least 10 times with a commercial-grade plate compactor.
That last step isn’t optional. Hand-tamping or rolling won’t pack the rock tight enough to prevent settling. You need a real plate compactor, run multiple passes in different directions, to get a stable surface that won’t move.
By the end of Day 1, the yard is graded, compacted, and ready for turf. Most of what makes a 15-year installation possible is already in the ground.
Artificial Turf Installation, Day 2: Turf, Infill, and Detail
Day 2 starts at 8:30 a.m. with the turf rolls staged at the project site.
We lay the turf, trim and seam it where panels meet, and secure the perimeter with five-inch ungalvanized nails every six inches. Ungalvanized is intentional, since the nails rust over time, expand in the ground, and create a permanent anchor that won’t pull loose. Your perimeter stays tight for the full life of the install instead of lifting after a few seasons.
Once the turf is down and secured, we spread the infill: two to three pounds of silica sand per square foot for most installations, or OptiFILL+ infill for pet projects. The crew works the infill into the turf with a power broomer, which forces the sand down to the base of the blades and lifts the fibers so they stand upright.
Without that power-broomer step, the turf looks flat and matted from the moment you walk on it. With it, the blades stand up straight and the yard reads as natural grass from across the street.
The Artificial Turf Installation Spec Sheet That Determines 15-Year Longevity
Three product features matter most for long-term performance.
The first is the blade polymer. We use a C8 polymer blade structure, the most durable available, so your yard looks great even after years of kids and dogs running on the same patch every day. Cheaper turf uses C4 or C6, which mat down under foot traffic within a couple of years.
The second is the backing. Our Triflow Backing drains 900+ inches of liquid per hour, and it’s triple hole-punched, which means your yard handles a Texas downpour without sitting in standing water. Most artificial turf on the market drains only around 30 to 35 inches of liquid per hour, leaving puddles every time it rains hard.
The third is Microguard antimicrobial coating, applied during manufacturing to prevent the bacterial growth that causes odor over time. We also deluster the blades during manufacturing so they don’t shimmer in sunlight, which is one of the easiest ways to spot fake-looking turf.
Artificial Turf Installation: The Final Walkthrough
After the infill is set and the cuts are clean, we walk the project with the homeowner. We check seams, perimeter cuts, the edges where turf meets concrete or flower beds, drainage flow, and how the yard reads from across the street.
David Turner, our owner, personally oversees every installation, so the work has been signed off by someone with skin in the game before we ever knock on your door for the walkthrough. We don’t leave until you’re satisfied, and pets and kids are welcome to test the yard on the spot.
Artificial Turf Installation: DIY or Hire It Out?
If you’re trying to decide between doing it yourself or hiring a professional, here’s the honest answer.
DIY can save you money. It’ll cost you a month of weekends, and the cuts and seams probably won’t be as clean.
The sub-base work is physically demanding and requires specialized equipment to do correctly. If you’re handy, patient, and willing to learn, you can get there. If you want a yard that looks great from Day 1 and lasts 15 years without trouble, hiring a professional crew is worth the cost.
Frequently Asked Questions About Artificial Turf Installation
How long does an artificial turf installation take?
Plan on two days with a professional crew for a typical 1,500-square-foot residential project. Day 1 covers sub-base work. Day 2 covers turf, infill, detail cuts, and walkthrough.
What’s involved in artificial turf installation?
A complete install includes excavation of existing dirt, weed barrier placement, sub-base material (three to four inches of decomposed granite or crushed limestone), compaction with a plate compactor, turf layout and seaming, perimeter securing with ungalvanized nails, infill application, power brooming, and a final walkthrough.
Can I install artificial turf myself?
You can, but it takes most homeowners about a month of weekends for a 1,500-square-foot project. The hardest parts to get right are sub-base compaction, perimeter cuts, and seaming. If you don’t have a commercial plate compactor, the sub-base work is the biggest hurdle.
Ready to See What a High-Quality Artificial Turf Installation Looks Like?
We’ve done 10,000 of them. Every one started with a proper sub-base, premium turf, and a crew that takes pride in the cuts. Every one finished with a walkthrough and our industry-leading 15-year warranty, which means if any part of the install fails, from seams to edges to drainage, we make it right at no cost to you.
If you’re thinking about artificial turf, get a free quote for an honest conversation about your yard and your options.